Honda Lawn Mower Drive System Parts: Belts, Cables and Wheels
Most Honda self-propelled mower problems come from a worn drive belt, stretched cable, damaged transmission, or slipping rear-wheel gears. The right repair starts with matching the mower’s exact model and serial details, then checking how the drive system transfers engine power to the wheels.
Does the mower run fine but stop pulling when the grass gets thick? Maybe the drive lever feels loose, the wheels turn unevenly, or a belt squeals under the deck. Those clues can point to different parts, and guessing can turn a small repair into a box of wrong pieces.
I once changed a drive belt because the mower had stopped moving, only to find a cracked plastic drive pulley hiding underneath. The new belt lasted about as long as a cup of coffee, and I had to pull the housing apart again. That’s a common mistake, not a dumb one.
I wrote this guide for anyone trying to identify Honda lawn mower drive system parts without getting buried in confusing diagrams or nearly identical model numbers. You’ll get a practical way to inspect the system, match parts, and decide when a home repair makes sense.
Get the diagnosis right, and you can avoid unnecessary parts, finish the job in one afternoon, and bring back smooth self-propelled motion. Skip the inspection, and a loose cable or worn gear can chew through a fresh belt.
This takes about 12 minutes to read, and the useful part is what you can do next:
- Identify the parts that transfer power from the engine to the drive wheels.
- Match belts, cables, wheels, and transmissions to the correct Honda mower.
- Test the drive system before buying replacement parts.
- Replace common components without creating a second problem.
- Know when a repair needs a mower shop.
Honda Lawn Mower Drive System Parts: What You Need
Honda lawn mower drive system parts usually include the drive belt, drive cable, pulley, transmission, axle, rear-wheel gears, and control hardware. A typical repair starts with a model check, a visual inspection, and a quick test of the drive lever before any part comes off.
The drive system works in a simple chain. The engine spins a pulley, the pulley moves a belt or gear assembly, the transmission turns the axle, and the axle drives the rear wheels.
The drive belt transfers rotation from the engine pulley to the transmission pulley. A belt can stretch, glaze, crack, or come off the pulley, especially after years of grass dust, heat, and small sticks getting into the housing.
The drive cable connects the handle control to the drive engagement arm. Pulling the lever tightens or moves that mechanism, allowing the transmission to receive power. A cable that has lost tension can make the mower creep, pull weakly, or refuse to move.
The transmission is the compact gear unit that changes engine rotation into wheel movement. Honda used different drive layouts across mower families, so a transmission that looks close may still have the wrong pulley position, gear ratio, mounting holes, or axle length.
The rear-wheel drive gears transfer torque from the axle to the wheels. Plastic or metal gear teeth can wear down, especially if a wheel is forced backward while the drive is engaged.
Before ordering anything, write down the full model code from the mower housing and the serial number from the identification label. A part listed for a similar Honda mower may have the wrong belt length or a different wheel gear, even when the deck shape looks almost identical.
| Part | What the part does | Common failure signs | Typical repair decision |
|---|---|---|---|
| Drive belt | Carries power to the transmission | Cracks, squeal, slipping, loose fit | Replace if worn or stretched |
| Drive cable | Engages the self-propel mechanism | Loose lever, weak pull, no engagement | Adjust first, replace if frayed |
| Transmission | Turns engine power into axle rotation | Grinding, locked axle, no wheel drive | Inspect or replace as an assembly |
| Rear-wheel gear | Transfers axle power into each wheel | One wheel slips or skips | Replace the damaged wheel or gear |
| Pulley | Guides and drives the belt | Wobble, broken edge, belt thrown off | Replace if bent, cracked, or loose |
| Axle and bearings | Support and rotate the wheels | Side play, scraping, stiff rotation | Clean, inspect, or replace damaged parts |
The right parts can be easier to locate with a dedicated model search, especially if the label is dirty or partly worn. matching Honda mower parts should start with the model and serial number, not just a phrase such as “Honda self-propelled belt.”
A mower that moves only on flat pavement may have a different problem from one that moves backward but not forward. Note the exact behavior before taking the cover off because the symptom gives you a head start.
How power reaches the wheels
The engine crankshaft spins the drive pulley beneath the mower deck or inside the drive housing. The belt carries that motion to the transmission, and the transmission turns the axle or wheel-drive gears.
The cable doesn’t create power. The cable only commands the system to engage, which is why adjusting a cable won’t fix missing belt teeth, a broken pulley, or a stripped wheel gear.
Some Honda mowers use a variable-speed control, while others rely on a fixed drive ratio. A variable-speed system can have extra control pieces and a different cable arrangement, so the model code matters even more.
Pro Tip: Roll the mower by hand with the drive lever released, then repeat the test with the lever held down while the engine is off. Resistance in only one position can point toward a cable, clutch, or transmission issue.
The first inspection
Before removing the drive cover, disconnect the spark plug wire and secure the wire away from the plug. Remove the battery or electric-start connection when the mower has one, and wait for hot engine parts to cool.
Turn the mower on its side only as the owner’s manual allows, with the air filter and carburetor positioned safely. Gasoline can leak into the air filter or crankcase if the mower is tilted the wrong way.
Check the belt for fraying along the edges, shiny glazed spots, missing chunks, and excessive slack. Then inspect the pulleys for wobble, grass packed around the shaft, or a groove that has worn sharp enough to push the belt sideways.
Pull the drive lever slowly while watching the cable and engagement arm. The arm should move smoothly and reach its stop without the cable strands stretching like loose wire.
How to Match and Test Honda Drive Parts
The safest way to match Honda drive system parts is to confirm the mower model, compare the old component, and measure only as a backup. Part names alone aren’t enough because Honda mower families can use different belts, wheel gears, cables, and transmission mounts.
Model identification comes first. The model code often appears on a label near the rear of the deck, handle support, or side of the mower, while the serial number may sit on the same label or a nearby plate.
Record every character, including letters and hyphens. One character can separate a push mower from a self-propelled version, or a standard-speed drive from a variable-speed system.
If the label has faded, compare the belt path, wheel diameter, cable ends, mounting brackets, and transmission shape. Those details help confirm a part, but they shouldn’t replace a model-based fit check.
A practical matching process
- Clean the identification label. Use a damp rag, not a harsh solvent that can remove the remaining print.
- Write the model and serial number down. Take a phone photo before dirt or glare makes the label harder to read.
- Identify the failed part. A belt, cable, wheel gear, pulley, and transmission need different checks.
- Compare attachment points. Look at cable ends, bolt holes, belt width, pulley grooves, and wheel-to-axle fittings.
- Check the drive layout. Note front-wheel drive, rear-wheel drive, or a transmission mounted between the rear wheels.
- Inspect related parts before ordering. A broken pulley can damage a new belt, and a stripped wheel gear can mimic a bad transmission.
- Keep the old part until the mower works. The old piece provides a useful reference if the replacement needs comparison.
A belt should sit fully inside the pulley groove without riding on the pulley rim. A cable should follow the original route, with enough movement to engage the drive but no sharp bend that makes the handle feel heavy.
I once found a mower with a perfectly sized replacement cable routed outside the handle bracket instead of through the factory guide. The drive worked on the stand but stayed partly engaged when the handle was released, which made the mower difficult to pull backward. A correct part can still cause trouble when the routing is wrong.
Belt, cable, wheel, or transmission?
A mower that starts moving only after the lever travels almost to the handle often needs cable adjustment or cable replacement. A mower that engages cleanly but slips under load points more toward a belt, pulley, wheel gear, or transmission problem.
Use the symptoms as clues, not proof:
| Mower symptom | Most likely area | What to inspect first |
|---|---|---|
| No self-propel movement | Cable, belt, pulley, transmission | Lever travel and belt position |
| Weak movement uphill | Belt, wheel gear, transmission | Belt glazing and wheel gear teeth |
| Drive works only when cable is held | Cable adjustment or cable stretch | Cable tension and engagement arm |
| One rear wheel skips | Wheel gear or axle | Wheel teeth and axle movement |
| Grinding sound | Transmission, pulley, or debris | Housing, gear teeth, and shaft play |
| Belt repeatedly comes off | Pulley, belt routing, shaft alignment | Bent pulley and mounting hardware |
| Mower won’t roll backward freely | Cable, clutch, or transmission | Confirm drive fully releases |
A drive cable is often the cheapest part to test because adjustment may restore the correct engagement. Don’t tighten the cable until the mower constantly pulls with the lever released, because that can overheat the drive and wear the belt.
To replace a belt, disconnect the spark plug wire first, remove the drive cover or deck access piece, photograph the original belt path, release the tension, and install the new belt in the same route. replacing a Honda mower belt is mostly a routing job, but the belt must sit in every pulley groove before the cover goes back on.
To replace a drive cable, disconnect the cable from the handle control and the lower engagement arm, then route the new cable through the same guides. replacing the Honda drive cable requires correct tension, because a cable that is too tight keeps the drive partly engaged and one that is too loose won’t pull the arm far enough.
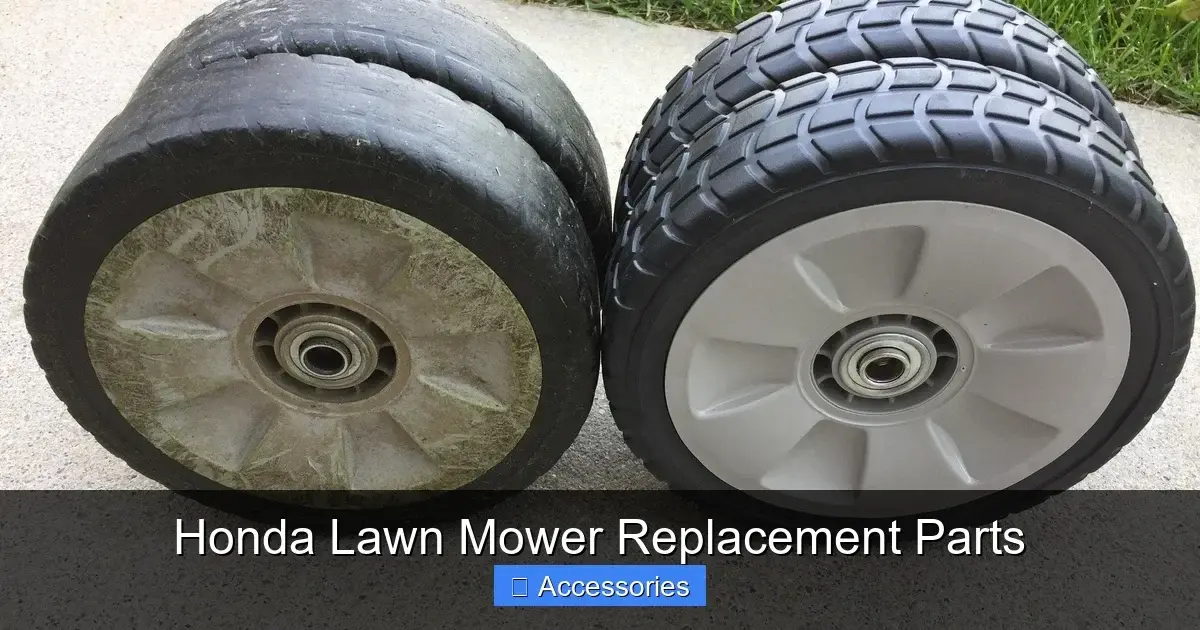
Rear wheels deserve a closer inspection than many owners give them. The wheel may look fine from the outside while the internal drive gear has worn smooth or cracked around the hub, so replacing Honda rear wheels means matching the wheel diameter, axle opening, and drive gear pattern.
The self-propel system may sound mysterious, but the basic sequence is straightforward. Honda self-propelled mower operation depends on the control cable engaging a belt or gear path that turns the transmission and rear axle.
Important Tip: Never test a running mower with a hand, shoe, stick, or tool near the belt, pulley, axle, or wheel. Keep the spark plug disconnected during inspection, and run a repair test only after every cover and guard is back in place.
Adjusting the drive cable
Cable adjustment differs by Honda model, so use the adjustment barrel or bracket provided on the mower. Make small changes, usually one or two turns at a time, then test the lever movement with the engine off.
The cable should engage the drive before the control lever reaches the handle. When released, the engagement arm should return fully and the rear wheels should roll without strong drag.
A frayed cable should be replaced rather than lubricated. Oil may quiet a dry cable for a short time, but broken strands can catch inside the housing and stop the cable from returning.
Replacing a drive belt safely
A belt replacement is a manageable home repair when the mower has clear access and the belt path is visible. The risky part is not the belt itself, but accidental engine movement while your fingers are near the pulley.
Disconnect the spark plug wire, remove the ignition key if fitted, and wait for the blade and engine to stop completely before opening the drive area. Never rely on the control lever alone to stop the machine from moving.
Take a photo before removing the old belt. Route the replacement around each pulley exactly as the original sat, then rotate the pulley by hand with the plug wire disconnected to confirm the belt tracks correctly.
If the new belt walks off the pulley, stop testing. A bent pulley, loose shaft, wrong belt length, or missing guide may be the real cause.
Common Repairs, Costs, and Troubleshooting
Honda drive repairs range from a simple cable adjustment to a transmission replacement, and the labor difference can be larger than the part price. A clear diagnosis matters because replacing a belt won’t help a stripped axle gear, while replacing a transmission won’t fix a loose cable.
Part prices vary by model, source, and whether the component is genuine, aftermarket, or sold as part of an assembly. The table below gives practical cost categories rather than a promise of a current retail price.
| Repair type | Typical difficulty | Parts cost category | Shop labor concern |
|---|---|---|---|
| Cable adjustment | Low | Minimal | Usually quick |
| Drive cable replacement | Low to moderate | Low to medium | Access and routing |
| Drive belt replacement | Moderate | Low to medium | Belt cover and tension |
| Rear-wheel replacement | Low to moderate | Low to medium | Gear alignment |
| Pulley replacement | Moderate | Medium | Shaft access |
| Transmission replacement | Moderate to high | Medium to high | Correct mounting and setup |
A mower shop becomes the better choice when the transmission is locked, the crankshaft or axle is bent, the housing has cracked, or the repair requires removing parts you can’t safely support. A professional diagnosis can cost less than buying three wrong components and still having a mower that won’t pull.
Troubleshooting after installation
Test the repaired mower in a clear area with no people, pets, loose stones, or tools nearby. Start with the drive control released, confirm the engine runs normally, and engage the drive at low speed.
Check these points in order:
- The mower moves forward without surging.
- The drive releases when the lever is released.
- Both rear wheels turn together when the system is designed to drive both.
- The belt stays centered and makes no sharp squeal.
- The cable and engagement arm return smoothly.
- The wheel height levers remain locked.
- No gear, belt, or axle noise rises under light load.
Why does a mower move on concrete but stop in thick grass? The drive may be slipping under load because the belt is glazed, the wheel gear is worn, or the transmission has internal wear. A flat surface can hide a weak drive that cannot handle taller grass or a small slope.
Why does the mower pull to one side after a wheel repair? One wheel may have the wrong gear, a damaged axle opening, or a different effective diameter. Uneven tire wear and packed grass around one wheel can add to the problem.
Why does the drive stay engaged after a cable replacement? The new cable may be routed incorrectly, adjusted too tightly, or attached to the wrong hole on the engagement arm. Release the control, disconnect the spark plug wire, and inspect the arm’s return movement before running the engine again.
Maintenance that protects the drive system
Brush packed grass away from the drive housing after mowing, especially when the lawn is damp. Wet clippings form a heavy, sticky layer that can hold heat around the belt and restrict wheel movement.
Keep the mower deck at the correct height for the grass conditions. Cutting too low forces the engine and drive system to work harder, while a dull blade adds load and makes the mower feel weaker even when the transmission is fine.
Check the rear wheels at the start of the mowing season. Spin each wheel by hand, look for side-to-side wobble, and inspect the gear teeth through the wheel opening when the design allows access.
Avoid dragging the mower backward with the drive engaged. Release the drive first, then pull the mower back, because forcing the wheels against the engaged transmission can damage small gear teeth.
Pro Tip: Mark the original cable adjustment with a small paint pen before loosening anything. The mark gives you a starting reference, but the final setting still depends on proper drive release and engagement.
Genuine, aftermarket, and used parts
Genuine Honda parts usually offer the clearest fit when the exact model is known. Aftermarket parts can work well, but the listing should provide matching dimensions, attachment points, and model coverage rather than a vague “fits most” claim.
Used transmissions and wheel assemblies can save money on an older mower, but inspect the axle for play and rotate the gears by hand. A used part with worn teeth may look cleaner than the original and still fail under load.
I’d choose a genuine cable or belt when the price difference is small because those parts affect fit and control. For a wheel on an older mower, a well-matched aftermarket replacement can be sensible if the hub and drive gear match exactly.
Key Takeaways:
- Match every Honda drive part by model and serial number before ordering.
- A loose cable, slipping belt, worn wheel gear, and failing transmission create different symptoms.
- Disconnect the spark plug wire before touching the belt, pulley, axle, or transmission.
- A new belt cannot correct a bent pulley or damaged transmission.
- The drive must release completely when the control lever is released.
FAQs About Honda Lawn Mower Drive System Parts
What are the main Honda lawn mower drive system parts?
The main Honda lawn mower drive system parts are the drive belt, drive cable, pulley, transmission, axle, rear-wheel gears, and control hardware. Some mower models combine certain pieces into an assembly, so the model code and serial number matter before ordering a replacement.
How do I know if my Honda mower needs a new drive belt?
A Honda mower may need a new drive belt when the belt is cracked, glazed, frayed, loose, or repeatedly slips from the pulley. Weak movement under grass, a squealing sound, and visible belt dust also point toward belt wear, but a damaged pulley can create the same symptoms.
Can I replace a Honda mower drive cable myself?
Yes, many Honda mower owners can replace a drive cable with basic hand tools and careful routing. Disconnect the spark plug wire first, photograph the old cable path, match both cable ends, and adjust the replacement so the drive engages firmly and releases fully.
Why does one rear wheel spin but the other Honda wheel does not?
One rear wheel may spin while the other stays still because the wheel gear is stripped, the axle gear is damaged, or the wheel hub no longer grips the drive fitting. Remove the wheel with the spark plug wire disconnected and compare the gear teeth, hub opening, and axle movement.
Are Honda self-propelled mower transmissions interchangeable?
No, Honda self-propelled mower transmissions aren’t automatically interchangeable. Mounting holes, axle length, pulley position, drive ratio, cable connection, and wheel gear design can differ between models, even when two transmissions look nearly identical.
Is a Honda drive repair worth doing on an older mower?
Yes, a Honda drive repair can be worth doing when the deck, engine, handle, and wheels are in good condition and the problem is a belt, cable, pulley, or single wheel. A transmission replacement deserves more thought if the mower also has heavy rust or engine trouble.
Getting Your Honda Mower Moving Smoothly Again
Honda lawn mower drive system parts work as a chain, so the best repair follows the chain from the control lever to the wheels. Start with the model and serial number, inspect the cable and belt, then check the pulley, transmission, axle, and wheel gears before buying anything.
My practical choice is to handle a cable, belt, or wheel repair at home when the mower is sound and the work area is safe. A locked transmission, bent shaft, or cracked housing deserves a repair shop, because saving a few dollars isn’t worth a mower that stays unreliable.
The clearest next step is simple: disconnect the spark plug wire, record the model details, and inspect the drive with the engine cold. That small bit of patience can save a second teardown and get the mower pulling properly again.