Honda Lawn Mower Adjustments: Height, Drive Cables and Engine Controls
Honda lawn mower adjustments usually come down to four jobs: setting the deck height, checking the drive cable, setting engine controls, and confirming safe operation. The right adjustment gives you an even cut and steady movement without making the engine labor or the mower creep on its own.
Are you fighting a mower that leaves tall strips, crawls too slowly, or refuses to pull smoothly? Is the engine surging while the drive handle feels loose, stiff, or oddly touchy?
I once tightened a self-propel cable during a rushed spring tune-up because the mower felt lazy on a slope. The drive started pulling as soon as I released the handle, and I had to back the adjustment off with grass clippings stuck to my gloves. That’s a common mistake, not a dumb one.
I wrote this guide for homeowners who want clear answers before turning a cable adjuster, moving a height lever, or touching an engine control. The goal is to help you make the small corrections that solve common problems and recognize the jobs that belong in a repair shop.
Get these settings right and you gain a cleaner lawn, less strain on the engine, and better control near trees, curbs, and slopes. Skip the checks, and a low blade, loose cable, or incorrect governor setting can leave rough patches, poor drive response, or a serious safety problem.
This takes about 12 minutes to read, then you can work through the mower at your own pace.
- You’ll set cutting height without guessing at the lever positions.
- You’ll tell a loose drive cable from a worn or damaged cable.
- You’ll check engine controls without chasing an incorrect RPM.
- You’ll know which adjustments are safe at home and which need a technician.
Honda Lawn Mower Adjustments: the Correct Order
Honda lawn mower adjustments work best in this order: make the mower safe, set all wheel levers to the same height, inspect the control cables, adjust cable slack, and test the machine on a level surface. Never start by turning an engine-speed screw or tightening every cable you find.
Start with the model code from the mower deck or handle area. Honda walk-behind models can use different height systems, self-propel designs, and control layouts, so a setting that fits an HRX may not fit an HRR or another series.
1. Make the mower safe
Before touching the blade area or reaching near a cable, shut off the engine, remove the spark plug boot, and wait for hot parts to cool. Remove the battery on a battery-powered model, and keep the fuel cap closed unless the owner’s manual calls for fuel-system service.
Wear work gloves around the blade, yet never treat gloves as permission to spin the blade casually. A blade can hold stored momentum, and the sharp edge can turn when the deck moves.
If the mower was running poorly, let the muffler cool before placing hands near the engine control bracket. Gasoline fumes also need fresh air, so work outdoors away from a pilot light, cigarette, or space heater.
2. Set the cutting height
Cutting height is the distance between the blade’s cutting plane and the ground. Most Honda walk-behind mowers use a lever at each wheel or a linked lever that moves several wheels together.
Set every wheel to the same notch unless your lawn has a deliberate slope adjustment. A typical cool-season lawn often looks best around 2½ to 4 inches, while a low setting can scalp uneven ground and expose dry soil.
The number printed beside a lever may show an approximate height, not a laboratory measurement. Tire pressure, a bent deck, worn wheels, and a lumpy yard can change the real blade height by a noticeable amount.
Use this process:
- Park on a flat driveway with the engine off.
- Disconnect the spark plug boot or remove the battery.
- Move each height lever into the same position.
- Check that each lever locks fully into its notch.
- Measure from the ground to the blade housing at each corner, keeping fingers away from the blade.
- Correct any lever that sits between notches or fails to lock.
- Reconnect the spark plug boot only after every hand is clear of the deck.
For a more detailed walk-through, use height adjustment steps when a linked deck, single-lever system, or wheel bracket needs closer inspection.
Cut only about one-third of the grass blade at a time. Dropping a mower from a tall setting to a very low setting may feel faster, yet the engine will work harder and the lawn can turn brown after a hot, dry week.
3. Check the drive cable
A self-propel cable transfers movement from the drive control to the transmission or wheel drive. The cable should have enough slack for the drive to stop fully when you release the control, but not so much slack that the handle moves without engaging the drive.
With the engine off, squeeze and release the drive control several times. Watch the cable housing and the lever near the transmission or drive assembly.
The housing should stay seated in its brackets. If the outer housing jumps out, the inner wire cannot pull the drive lever through its full range, and a simple cable adjustment may look like a transmission failure.
A practical test looks like this:
- Released control: drive lever fully returns to its stop.
- Control squeezed lightly: drive begins without a long dead spot.
- Control held normally: mower moves without slipping or surging.
- Control released: wheels stop driving promptly.
A drive cable that is too tight may make the mower creep with the control released. A cable that is too loose may create weak propulsion, delayed engagement, or a handle that reaches the grip before the drive responds.
4. Check engine controls
Honda engine controls can include an engine-stop cable, flywheel-brake cable, throttle linkage, choke linkage, and governor parts. Many modern walk-behind engines manage speed automatically, so the cable may control stopping or operating mode rather than giving you a normal throttle range.
Engine RPM means revolutions per minute, or how fast the crankshaft spins. The governor normally manages engine speed under changing blade and grass loads, so an owner should not raise RPM just to make the mower sound stronger.
If the engine hunts, bogs, or runs too fast, first inspect the air filter, fuel quality, blade condition, and cable movement. A bent linkage or missing spring can create a speed problem that no cable adjustment can fix.
How to Adjust Honda Mower Cables Without Guessing
Honda mower cables need small changes, followed by a full test after each change. Turn the threaded adjuster only a few turns at a time, then tighten the lock nut and check the control again.
Most cable adjusters use a threaded barrel, lock nut, or clamp. Turning the barrel changes the relationship between the outer housing and the inner wire, which changes how far the control lever travels.
The direction of adjustment varies by cable layout. Instead of memorizing “clockwise means tighter,” watch what happens at the control and drive lever after each small change.
Adjusting a self-propel cable
Before adjusting a self-propel system, keep the spark plug boot disconnected on a gas mower and keep the battery removed on a battery model. Never test wheel drive with the mower raised on an unstable object.
- Find the cable adjuster near the upper handle or lower drive bracket.
- Mark the original position with a small pencil line.
- Loosen the lock nut.
- Make a small adjustment, usually one or two turns.
- Tighten the lock nut against the adjuster.
- Place the mower on the ground and test released, partial, and full control positions.
- Repeat only if the drive still fails one of those tests.
The control should not need to be pulled against the handle with excessive force. A stiff handle can point to a kinked cable, rust inside the housing, a seized drive lever, or a damaged transmission part.
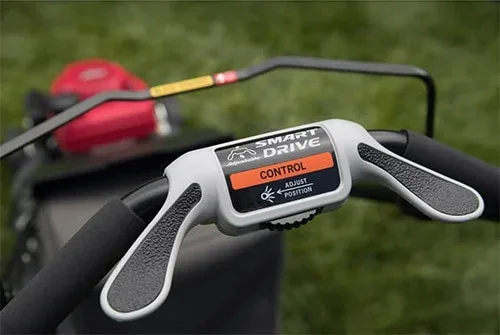
A Smart Drive system uses a hand control that senses your input and changes propulsion response. The cable arrangement differs from a simple bail-style drive, so use Smart Drive cable guidance before changing the adjuster on that style of mower.
Honda HRX models with a hydrostatic drive may use a different clutch cable arrangement. If the mower slips, creeps, or fails to stop after a careful cable adjustment, compare the symptoms with HRX clutch cable advice instead of forcing the adjuster past its normal range.
What if the mower moves only on a slope but not on flat ground? That points more toward belt, wheel, transmission, or traction trouble than ordinary cable slack, especially if the control reaches its full travel.
Adjusting an engine-stop or control cable
An engine-stop cable pulls a stop lever or flywheel-brake mechanism when you release the operator control. The cable must let the stop mechanism move fully, because a mower that keeps running after the control is released is unsafe.
With the engine off, release the handle and watch the cable end. The stop lever should return firmly against its stop, and the cable should not bow so far that it catches on the bracket.
Check these points before making a cable change:
- The cable housing is seated in its clamp.
- The inner wire is not frayed.
- The handle bracket is not bent.
- The stop lever moves through its full range.
- The cable does not rub the blade-control area or exhaust shield.
A frayed cable should be replaced rather than shortened with extra tension. Tightening a damaged cable can hide the weak spot until the wire breaks at the worst time.
Checking RPM safely
Use a handheld tachometer only if the model procedure calls for it and the tool can be used from a safe position. Keep loose sleeves, hair, hands, and tools away from the blade, belt, flywheel, and rotating linkage.
Honda engine speed should match the model’s specification, not a generic number copied from another mower. Blade tip speed, noise, cutting quality, governor operation, and safety limits all depend on the correct setting.
For the proper checking method, RPM checking guidance can help you separate a real speed problem from normal governor movement. I’d leave governor spring changes and stop-screw changes to a qualified small-engine technician unless the model service procedure clearly assigns that work to the owner.
A mower that sounds fast may have a loose blade, damaged blade adapter, or exhaust issue. A mower that sounds slow may have a dull blade packed with wet grass, a dirty filter, stale fuel, or an overloaded deck.
Why the self-propel system feels different
A self-propelled mower uses an engine or motor to turn the wheels through a drive system. The operator controls engagement and speed through a bail, lever, Smart Drive pad, variable-speed control, or another handle-mounted input.
The drive system may use a belt, gearbox, clutch, hydrostatic unit, or wheel gears. Self-propelled drive basics can help you identify why cable tension alone doesn’t always fix weak movement.
I once replaced a drive cable that looked loose, only to find the real problem was a housing end that had slipped out of its bracket. The new cable still felt wrong until I reseated the housing, which taught me to inspect both ends before turning an adjuster.
| Adjustment area | What normal operation feels like | Trouble sign | First check |
|---|---|---|---|
| Wheel height | Lever locks firmly in a chosen notch | Lever slips or sits between notches | Wheel bracket and height spring |
| Drive cable | Smooth engagement with no creep released | Creep, delay, or weak pull | Cable housing seats and inner wire |
| Smart Drive control | Speed changes predictably with hand pressure | Surging or no response | Control movement and cable routing |
| Engine-stop cable | Engine stops when the control is released | Engine keeps running | Stop lever and cable return |
| Governor linkage | Engine holds steady speed under load | Racing or repeated hunting | Air filter, linkage, spring, fuel |
| Blade system | Even cut without heavy vibration | Shaking, noise, rough cut | Blade balance, adapter, mounting |
Common Problems, Fixes, and Service Limits
Most mower adjustment problems come from a short list: uneven deck height, cable housing movement, stretched or kinked cable, poor blade condition, clogged airflow, or a control part that cannot return to its stop.
A clean inspection saves time because cable tension cannot repair a bent bracket or worn drive gear. Make one change at a time, and write down the starting position before touching an adjuster.
The mower leaves tall strips
Tall strips usually come from uneven wheel settings, a bent deck, a dull blade, low engine speed, or grass that is too wet and thick for the selected height.
Check the wheel levers first. Then inspect the blade for a rounded cutting edge, packed clippings, or a bend.
Never put a hand under the deck to clear grass. Disconnect the spark plug boot or battery first, tip the mower only as the manual directs, and use a stick or scraper while keeping your fingers away from the blade edge.
A blade that is sharp on one side and damaged on the other can make the mower shake and leave alternating strips. If vibration started after striking a rock, stop mowing and have the blade, adapter, and crankshaft checked.
The mower creeps with the drive released
A creeping mower has a drive-control problem until proven otherwise. The cable may be too tight, the housing may be displaced, or the drive lever may be sticking near the transmission.
Release the control and watch the lever at the drive end. If the lever does not return to its stop, clean around the pivot and inspect for a bent part, but don’t spray random lubricant near a belt or clutch.
If the lever returns fully and the wheels still drive, the fault may be inside the clutch, gearbox, hydrostatic unit, or wheel-drive assembly. That’s a good point to stop adjusting and arrange qualified service.
The mower moves too slowly
Slow movement can come from low engine speed, a slipping drive belt, worn wheel gears, a clogged deck, low tire pressure, or a cable that does not pull the drive lever far enough.
A cable adjustment is reasonable when the cable has clear slack and the drive lever stops short of its normal position. It is not a cure for a belt that smells hot, a transmission that leaks, or a wheel that spins freely on its axle.
One easy check is to compare both drive wheels for damage and packed grass. If one wheel has worn teeth or a seized bearing, the mower may pull unevenly even though the cable feels fine.
The engine surges or races
Surging often means the engine is reacting to restricted airflow, dirty fuel passages, stale fuel, or a governor linkage that cannot move freely. Racing can mean a disconnected governor spring, incorrect linkage, or an unsafe engine-speed setting.
Pro Tip: Take a photo of the linkage before cleaning around it. A quick photo can save a lot of head scratching when several springs sit close together.
Do not bend the governor spring or move the speed stop because the mower sounds weak. First clean or replace the air filter as directed, inspect the blade and underside for heavy buildup, and confirm that the control cable moves smoothly.
If the engine races after a spring or linkage has come loose, shut it off immediately. A technician should check the governor system before the mower runs again.
The engine won’t stop
An engine that won’t stop after releasing the operator control has a serious control problem. Keep clear of the blade, move away from the mower, and use the model’s approved stopping method rather than reaching into the deck area.
After the engine stops and cools, inspect the stop cable, handle bracket, and stop lever. A cable that has pulled out of its clamp can leave the lever in the run position even though the handle feels normal.
Never bypass an operator-presence control to make starting easier. That shortcut removes a safety feature and can turn a small adjustment into a dangerous machine.
The height lever won’t lock
A height lever that won’t lock may have a bent bracket, weak spring, worn notch, packed dirt, or a wheel assembly mounted out of position. Don’t rely on the lever’s appearance alone, because a lever can feel firm while the wheel still shifts during mowing.
Clean the bracket area, check the spring, and confirm that the wheel bolt and spacer match the model layout. Replace a damaged bracket rather than welding or bending it back beside the fuel tank.
Maintenance That Keeps Adjustments Stable
Cable adjustments last longer when the mower receives basic service. A cable exposed to water, dried grass, and grit can become stiff even if the outer housing still looks clean.
A seasonal service plan should include:
- Checking engine oil before mowing and changing it on the schedule in the manual.
- Cleaning or replacing the air filter as required.
- Inspecting the blade, adapter, and mounting hardware.
- Clearing grass from the deck and cooling fins.
- Checking cable routing, clamps, and return movement.
- Inspecting drive belts, wheels, and transmission areas.
- Using fresh fuel and storing the mower as directed.
The full service sequence differs between gas and battery models. Use Honda mower maintenance steps to match the inspection to the power system and service interval.
Important Tip: Don’t lubricate every cable automatically. Some cable housings are designed for replacement rather than oiling, and oil can collect grit or reach a belt and cause slipping.
A clean deck helps the blade maintain airflow and reduces load on the engine. Remove clippings after the mower is safe and cool, because a packed deck can make a correctly adjusted mower cut like a tired one.
When to Stop Adjusting and Get Help
A home adjustment is a good fit when the problem is clearly a height lever, cable slack, housing position, or loose lock nut. A repair shop is the safer choice when the problem involves high engine speed, a bent crankshaft, internal transmission damage, fuel leaks, or a failed safety control.
Stop work if you find any of these signs:
- Fuel dripping, strong fuel odor, or a wet carburetor area.
- A blade that is cracked, badly bent, or impossible to balance.
- Severe vibration after a hard impact.
- An engine that races and won’t respond to the stop control.
- A drive system that stays engaged after cable correction.
- A frayed cable near the handle or engine.
- A cracked deck, loose engine mount, or damaged wheel bracket.
Safety starts before the risky step. Disconnect the spark plug boot before blade or deck work, remove the battery before electrical or blade-area service, keep the mower on stable ground, and never test a raised mower with the blade or wheels rotating.
A simple final test
After any adjustment, test the mower in a clear, flat area away from people, pets, cars, and loose stones. Keep the first run short so a wrong setting doesn’t become a damaged part.
Check the mower in this order:
- Start the engine according to the normal procedure.
- Confirm that the engine-stop control works.
- Listen for grinding, rattling, or unusual vibration.
- Engage the drive briefly and release it.
- Confirm that the wheels stop driving when released.
- Mow a small patch and inspect the cut.
- Recheck for loose hardware or cable movement after shutdown.
A clean test tells you more than repeated driveway adjustments. If the mower cuts evenly, stops correctly, and drives without creep or delay, the adjustment is doing its job.
FAQs About Honda Lawn Mower Adjustments
How do I adjust the height on a Honda lawn mower?
Move every wheel-height lever to the same marked position, confirm that each lever locks, and measure the deck on flat ground if the cut still looks uneven. Honda mower height settings vary by model, and a bent wheel bracket or worn wheel can make matching lever positions produce different real cutting heights.
How do I adjust a Honda mower self-propel cable?
Loosen the cable adjuster lock nut, make a small change, retighten the nut, and test released, partial, and full control positions. The mower should not creep with the drive control released, and the handle should not need excessive force. Replace a kinked or frayed cable instead of adding more tension.
Can I adjust Honda mower RPM myself?
Honda mower RPM should be checked against the specification for the exact engine model, not adjusted by sound. A handheld tachometer and the correct service method may be suitable for a careful owner, yet governor springs, linkage changes, and stop-screw changes are safer in qualified hands.
Why does my Honda mower surge after an adjustment?
A Honda mower may surge because of restricted airflow, stale fuel, a dirty fuel system, a governor linkage problem, or grass packed under the deck. Cable adjustment rarely fixes engine hunting by itself. Inspect the air filter, blade load, linkage movement, and fuel condition before changing engine-speed parts.
Why does my Honda self-propelled mower creep when I release the handle?
A Honda self-propelled mower may creep because the drive cable is too tight, the cable housing has moved, or the drive lever is sticking. If the drive lever returns fully and the wheels still pull, the clutch, gearbox, hydrostatic unit, or wheel drive may need professional inspection.
How often should Honda lawn mower cables be checked?
Honda lawn mower cables deserve a quick inspection before the mowing season and after any impact, storage period, or control change. Look for fraying, kinks, rust, loose housing clamps, and incomplete return movement. A cable that feels rough or catches should be replaced or serviced before regular mowing.
Set the Mower Once, Then Test It
Good Honda lawn mower adjustments don’t require brute force or a pocket full of guesswork. Set the deck evenly, inspect both ends of each cable, make tiny changes, and test the mower after every correction.
My strongest advice is to leave engine-speed changes alone until the blade, filter, fuel, deck, and governor linkage have been checked. A mower that stops properly, cuts evenly, and engages the drive without creep is ready for regular work, while a machine that still races, vibrates, or pulls after adjustment needs qualified service rather than one more turn of the wrench.